User Management
Akila currently supports two types of users: enterprise users and service provider users.
| User Type | Description |
|---|---|
| Enterprise User | Enterprise users are employees of your company who have various levels of access to the web platform based on their assigned departments and roles. |
| Service Provider | These users interact with Akila via our mobile app or web app. They are typically users from companies contracted by your organization to perform on-site work. |
Akila uses Role-Based Access Control (RBAC). What you can view and edit on our platform is determined by your role. Below are all potential role permissions, applicable sites, and the user creation process.
Users should be added in the following order: Add Role → Add Department → Add User. The Department step is optional; if the role you want to create does not belong to a department, you can skip this step.
Add Enterprise User
1.Add Role
1.1 Click "+Add" and select "Add Role" in the top right corner. 1.2 Input "Role Name" and select its "Related Parent Role". Note: Fill in the role name, related parent role, and role description. Regarding the "Related Parent Role": If the currently logged-in user has "All user roles data" permissions under "Enterprise User Role Access", this field is optional. If the current user has "All roles data under this role and its sub-roles" under "Enterprise User Role Access", this field is required. 1.3 Select "Menu Permissions" Note: You can select which menus the role can view and what permissions it will have. 1.4 Select "Data Permissions" Note: **Site Permissions:** Determines which sites under the client the role can access. **Other Data Permissions:** Includes enterprise user access (after selecting operation permissions for enterprise users in step 1.3), enterprise user role access (after selecting permissions for enterprise user roles in step 1.3), work order access (after selecting permissions for work orders in step 1.3), inspection access (after selecting permissions for inspections in step 1.3), and waste log access (after selecting permissions for emissions logs in step 1.3). **Enterprise User Access:** If you select "All users data", the role can view all users on the user tab of the enterprise user list, and the operation permissions depend on the configuration in step 1.3. If you select "All users data under this role and its sub-roles", the role can only view itself and its sub-users, and the operation permissions depend on the configuration in step 1.3. **Enterprise User Role Access:** If you select "All user roles data", the role can view all roles on the role tab of the enterprise user list, and the operation permissions depend on the configuration in step 1.3. If you select "All roles data under this role and its sub-roles", the role can view all roles, but only this role and its sub-roles have the operation permissions configured in step 1.3. **Work Order Access / Inspection Access / Carbon Emissions Log Access:** If you select "All data", the role can view all data. If you select "Data created by me/assigned to me", the role can only view data related to itself. 1.5 Click "Submit" Note: After submitting, a new role is created and will be displayed in the Role List page. To quickly create a similar role, click "Copy" in the action bar of the role list page, enter the new "Role Name", then you can either keep the same permissions as the original role or redefine them, and finally click "Submit". This allows you to quickly create and duplicate a role.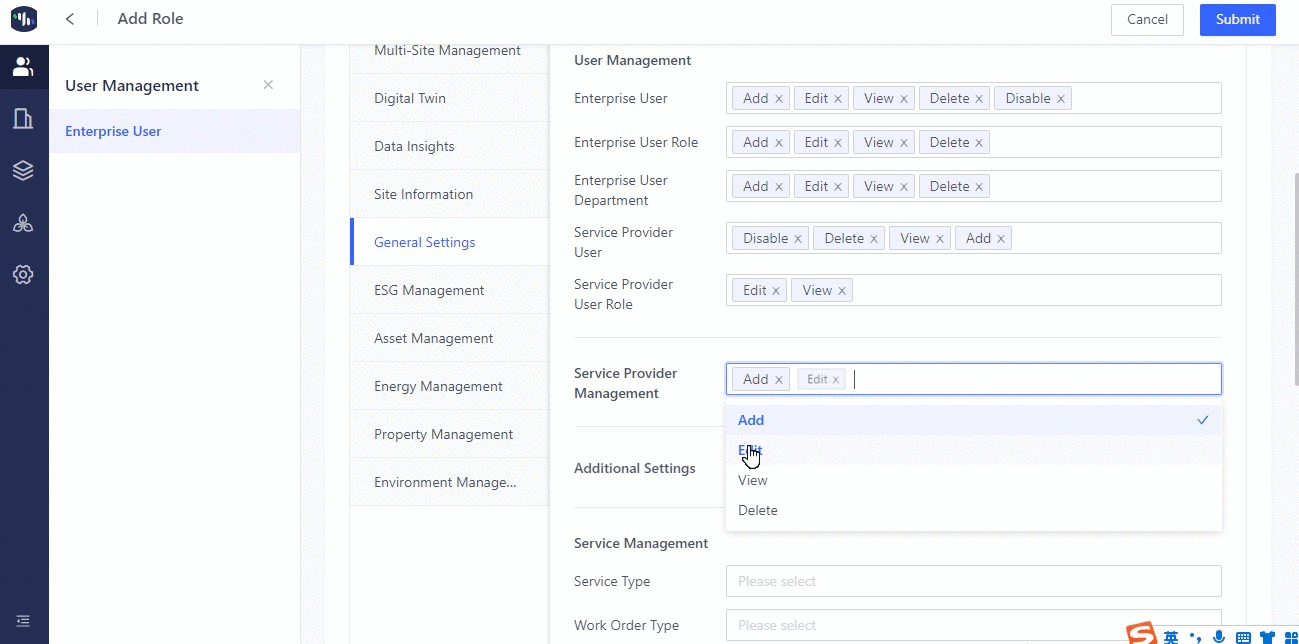
2.Add Department(Only for enterprise user)
2.1 Click "+Add" and select "Add Department" in the top right corner. 2.2 Input "Department Name" and Select "Related Parent Department". Note: You need to fill in the basic department information. The "Related Parent Department" field is optional. If you add a parent department, the department hierarchy will be created. 2.3 Click "Submit".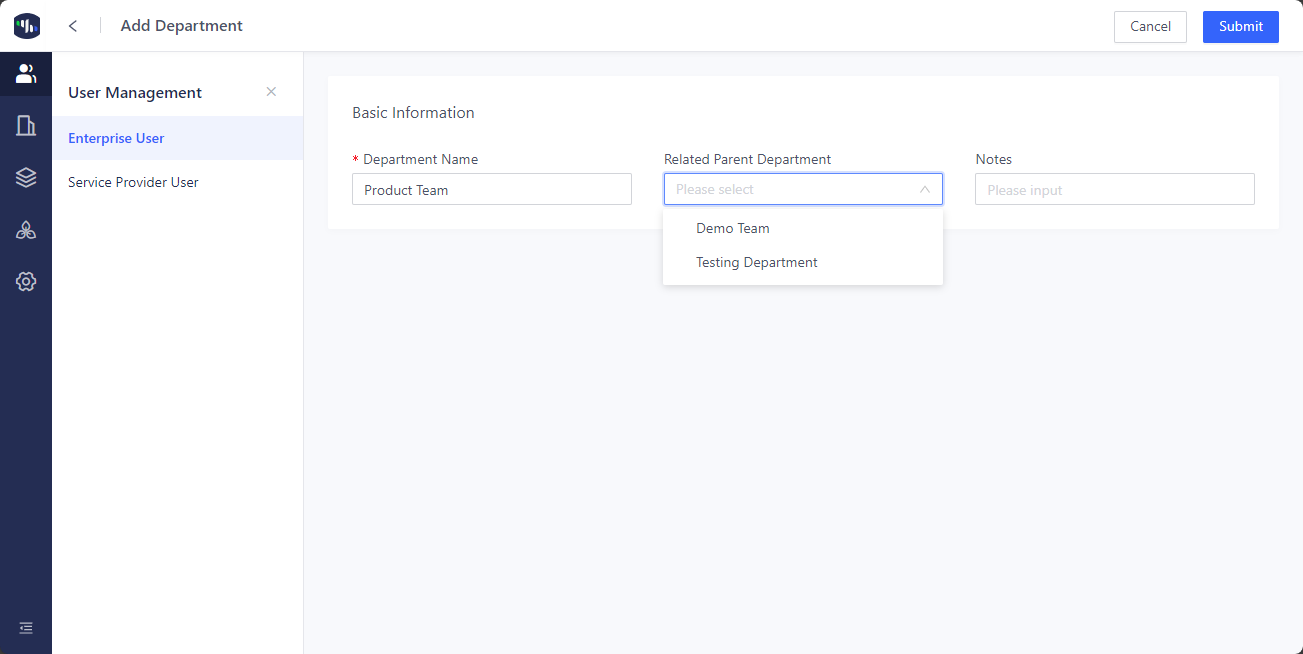
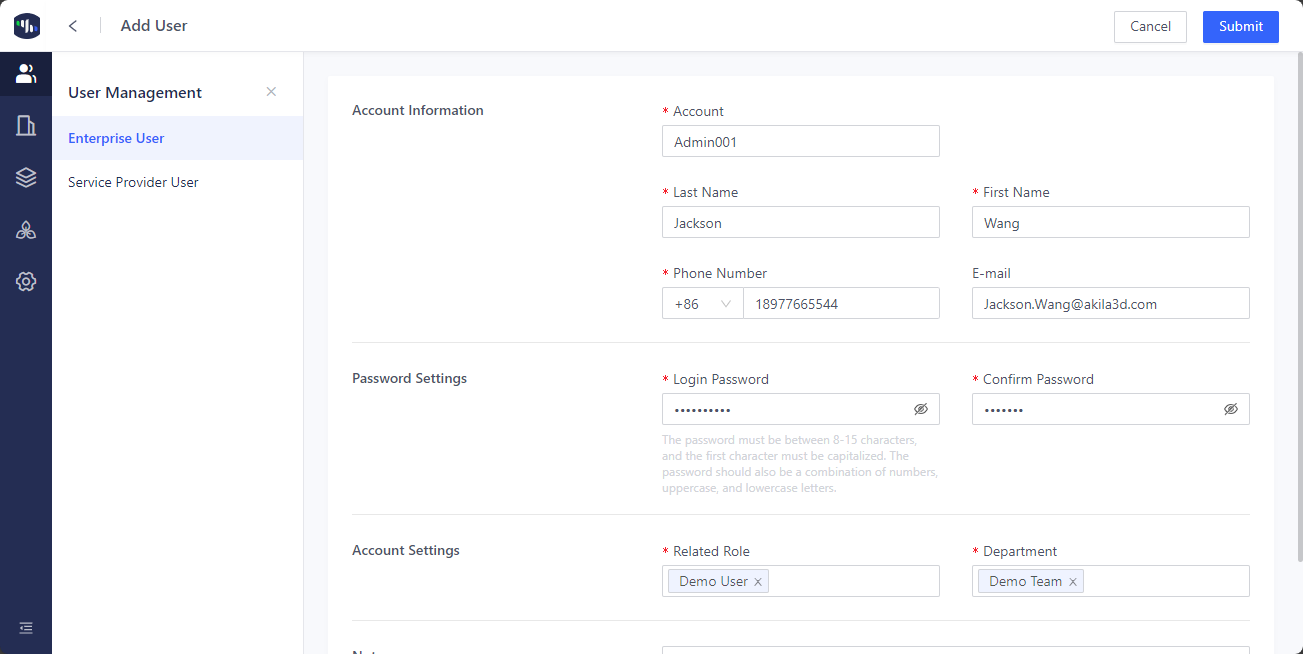
3.Add User
3.1 Click "+Add" and select "Add User" in the top right corner. 3.2 Enter the "Account Information" and set a password. Note: The account and phone number can be used to log in to Akila or reset the password via mobile verification code. When adding a service provider user, you must first add the service provider on the Service Provider Management page. 3.3 Select a "Related Role" and "Department" (only for enterprise users). 3.4 Click "Submit".