Energy Saving Analysis
Energy saving is typically defined as the difference in energy consumption measured before and after implementing an energy efficiency retrofit.
It is calculated as follows: Energy Saving = Energy Consumption at Baseline Period - Energy Consumption after Retrofit ± Adjustment (this feature is coming soon).
You can use it to:
- Customize your own dashboard.
- View energy savings by Historical Data, Target Consumption, or Weather Adjusted Baseline Usage.
| Term | Description |
|---|---|
| Historical Usage | Displays historical consumption data for the currently selected energy type. Enables energy savings analytics for historical baselines based on sub-meter and main-meter data, allowing you to track equipment or location-specific energy efficiency projects. |
| Target Usage | Set target consumption data for each month. Akila will collect actual usage data, enabling you to compare targets with actual performance. |
| Baseline Period | The reference period for energy-saving projects used for comparison. You must define energy usage for a specific period, which serves as the benchmark for future energy-saving calculations. |
| Reporting Period | The period during which the energy-saving project operates, and for which energy-saving efficiency needs to be calculated. |
| Training Period | The time period required for the AI model to learn normal operational behavior. You need to define a period of relatively stable and representative historical data for training. This allows you to exclude abnormal data or errors caused by force majeure, resulting in more accurate energy savings analysis. |
Add Dashboard (By Weather Adjusted Usage)
- Click "+Add" on the top right corner
- Input dashboard name
- Input dashboard description
Note: This field is optional. It serves as a note for your dashboard where you can add descriptive information. - Select Weather Adjusted Usage as the Baseline Type
- Select Baseline Period and Reporting Period
Note: When the baseline period is left empty, the AI will use all historical data prior to the reporting period during training. If you select a baseline period, the AI will assign more weight to this period compared to other historical data before the reporting period. Please note that historical data before the reporting period must be at least 90 days, and the reporting period should not exceed 1 year. - Select "Object"
Note: The available selection options in this section are identical to those on the Energy Monitoring page. - Select Energy Price Template
Note: It is configured on the Energy Price Configuration . You can click "Save as Draft" at any step between 1 and 7 to resume exactly where you left off without rework. - Click Save.
Note: If you configured a template in step 7, the total saved/overspent cost will be displayed. After adding this dashboard, click "View Details" on the right side, and one of the following two scenarios will appear:
Weather Adjusted Usage - View Details(Selecting Baseline Period)
- Click "View Details" on the right part of the chart
- Display weather adjusted usage details
- View baseline period
- View dominating factors
Note: The weather factor with the highest correlation level is listed first. Correlation levels are classified as strong, medium, and weak. "Strong" means the factor has a significant impact on energy usage. - View R²
Note: If the value is greater than 0.5, it is highlighted in green; otherwise, it appears in the default color. - View charts
- View statistical information
- View AI insights.
Note: It appears when a single factor has overwhelming influence.
Weather Adjusted Usage - View Details(Not Selecting Baseline Period)
- Click "View Details" on the right part of the chart
- Display weather adjusted usage details
- View modeling period
- View dominating factors
Note: The weather factor with the highest correlation level is listed first. Correlation levels are classified as strong, medium, and weak. "Strong" means the factor has a significant impact on energy usage. - View R²
Note: If the value is greater than 0.5, it is highlighted in green; otherwise, it appears in the default color. - View charts
- View statistical information
Add Dashboard (By Historical Usage)
- Click "+Add" on the top right corner
- Input dashboard name
- Input dashboard description
Note: You can optionally fill in the field. It is just a note for your dashboard. You can add description about the dashboard. - Select Historical Usage as the Baseline Type
- Select "Baseline Period" and "Reporting Period"
- Select "Object"
Note: The available selection options in this section are identical to those on the energy monitoring page. - Select Energy Price Template
Note: Configured on the Energy Price Configuration page. You can click "Save as Draft" at any step between 1 and 7 to resume exactly where you left off without rework. - Click Save
Note: If you configured a template in step 7, the total saved/overspent cost will be displayed.
Add Dashboard (By Target Consumption)
Tips: If this site has no KPIs and this option is grayed out, go to step 1. If this site has KPIs, go to step 2.
- Click "Go to Site KPI" and turn to KPI Management page
Note: You should first add portfolio KPI and assign it to this site. - Go back to current page and click "+Add"
- Input dashboard name
- Input dashboard description
Note: You can optionally fill in the filed. It is just a note for your dashboard. You can add description about the dashboard. - Select Target Consumption as Baseline Type
- Select "Object"
Note: The available selection options in this section include only energy usage types. These energy usage types can be matched with the KPIs you set. - Select Energy Price Template
Note: Configured on the Energy Price Configuration page. - Select Date Range
Note: You can click "Save as Draft" at any step between 1 and 8 to resume exactly where you left off without rework. - Click Save.
Note: If you configured a template in step 7, the total saved/overspent cost will be displayed.
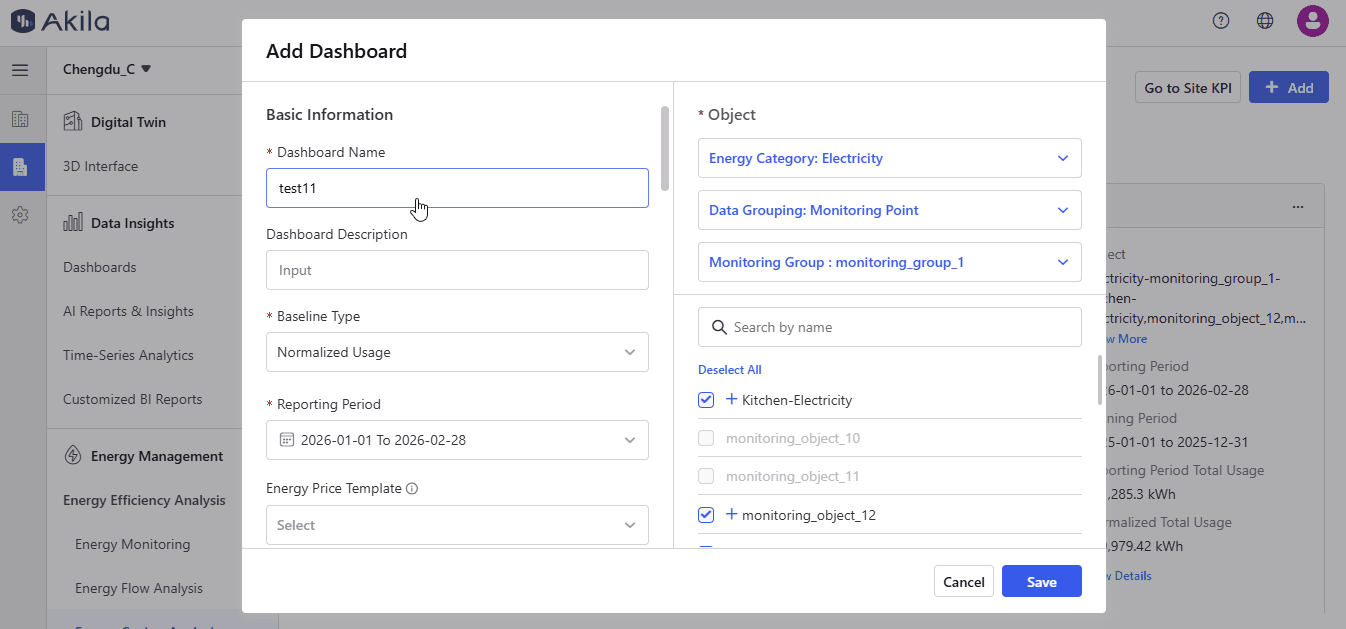
Add Dashboard (By Normalized Usage)
- Click "+Add" on the top right corner
- Input dashboard name
- Input dashboard description
Note:
You can optionally fill in the field. It is just a note for your dashboard. You can add description about the dashboard. - Select Normalized Usage as the Baseline Type
- Select Reporting Period
- Select Baseline Period(optional)
- Select Training Exclusion Period
Note: The Data Cleansing controls enable you to exclude abnormal days (e.g., shutdowns, lockdowns, sensor errors) from both the training dataset and the baseline period, with automated backfilling of estimated values for the baseline. - Select Factors
Note: All factors are checked by default. A checked factor indicates that the model will include it in its calculations. Toggling the button allows you to upload your own data for the factor at the bottom of the page, replacing the built-in values. - Add Custom Factor
Note: You can add any factors that were not included in the previous step. - Select "Object"
Note: The available selection options in this section are identical to those on the energy monitoring page. - Select Energy Price Template(optional)
Note: Configured on the Energy Price Configuration page. - Select "Publish to all users"
Note: Once selected, all users under this site can view the dashboard. You can publish up to 5 dashboards for this site. You can click "Save as Draft" at any step between 1 and 12 to resume exactly where you left off without rework. - Click Save
Note: If you configured a template in step 9, the total saved/overspent cost will be displayed.
Normalized Usage - View Details
- Click "View Details" on the right part of the chart
- View Summary tab
Note: You can view Usage Overview, Period Information, Model Quality and Daily Breakdown here. If you add the exclude periods, you can view the specific periods you add. Model quality explains how reliable and stable the normalization model is. You can also export the daily breakdown values. - View Drivers tab
Note: Coefficient: A number that shows how strongly a factor affects the model's result. Positive (+) coefficient: The higher the factor, the higher the result. Negative (-) coefficient: The higher the factor, the lower the result. Absolute value: A larger number often means a stronger effect. Caution: You cannot directly compare coefficients from different factors because they may use different units and scales
View Dashboard
- Click "Dashboard" in the top left corner.
- Select the dashboard(s) you want to view.
Note: You can select one or multiple dashboards. - Click "Apply".